
Late 1890s Corset Part 3 - Construction
- Jul 1, 2021
- 6 min read

Ok, so my corset quietly slipped from being a "work in progress" to an "unfinished object" sometime during March and April, mostly because I did NOT want to thread mark my panels. But in May I finally got back to work!
Previously, I had finished my mockups and cut out the final pieces for my late 1890s corset, and once the panels were thread marked (and I figured out my way around a new-to-me sewing machine), I could really get to work.
Practice Runs
I did tests of all my seams, finishes, and bone casings first, then tested the seam finishes on curvy test panels. I combined panels 1 & 3 and panels 2 & 4 of my corset so that I had a panel with both bust and hip curves. The seam finish I intended to use did just fine on the hip curves, but I should have clipped the bust curve to make the seam less lumpy. Lesson learned! (I'll go over my seam method below.)
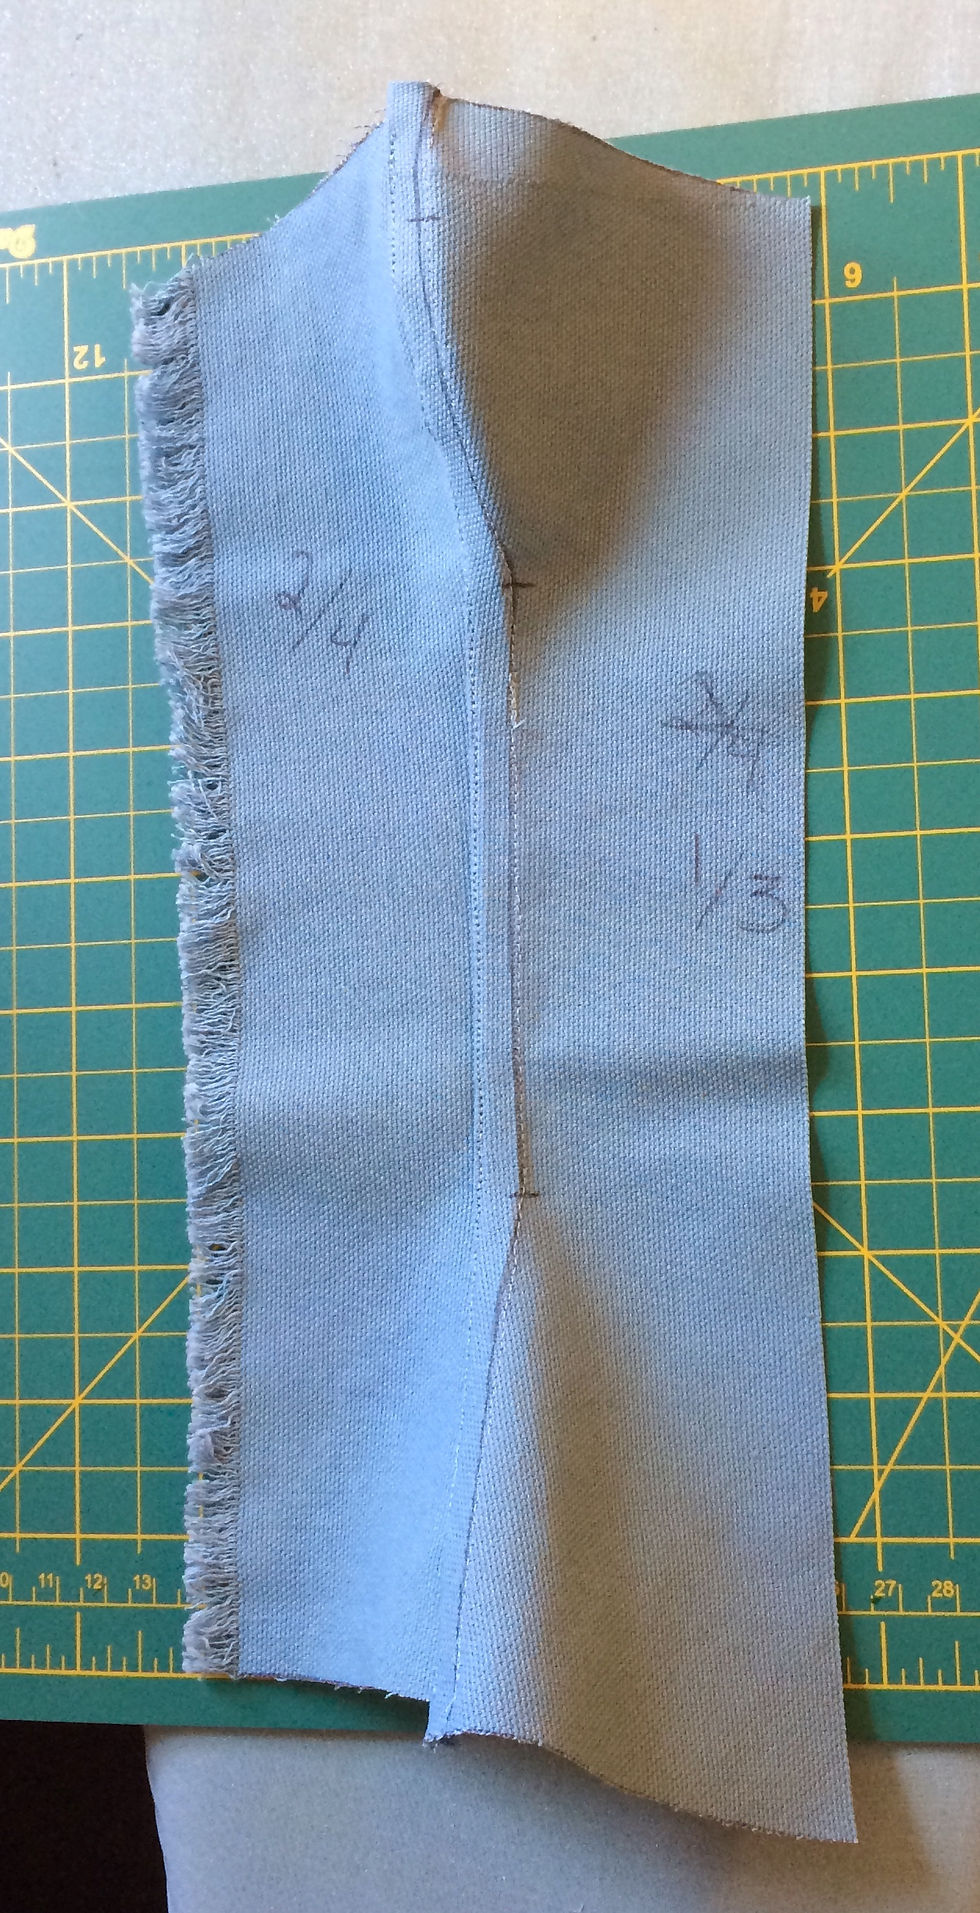
Lacing Panels
With that prep work done, I could prepare the back lacing panels. Each panel has a quarter-inch bone casing on either side of the grommet strip. The grommets I have are about a half-inch wide at the outer edges, so I made the grommet strip three quarters of an inch wide to give them some extra space. For this area of the back panels, I cut an extra wide seam allowance along the back edge (about 2.5") so that I could fold it over twice to create the bone casings and reinforce the grommet strip.
Busk
Then it was on to the busk. I cut two 2" strips the length of the front panels. For the "loop" side of the busk, I traced the busk onto the strip and sewed it to one front panel, taking care not to sew over where the loops would stick out. I could then slot the busk into the openings and carefully use a zipper foot to sew around the busk, keeping it in place.
For the "peg" side of the busk, I sewed the 2" wide strip to the front edge like normal, then ironed the seam, folding the strip toward the back of the front panel. I used the looped part of the busk as a template to mark where the pegs should be, poked holes in the front panel there with an awl, and poked the pegs through. Once I had double checked that both sides of the busk lined up properly (according to the marked bust, waist, and hip lines) I carefully sewed around the busk to hold it in place.
Seaming
After doing up all the seams and agonizing how to best describe them, I realized that they're just machine-sewn felled seams. You sew up the seam itself the way you would any seam, then trim your seam allowances so that one wider side can wrap around the thinner seam allowance and be sewn down. To allow these seams to double as boning channels (therefore they needed to be wide enough for bones to go through) I trimmed one seam allowance to a little over a quarter-inch, and the other to a bit over half an inch. Then the half-inch allowance was folded around the quarter-inch and pressed down to cover all the raw edges. I top stitched this down a quarter inch away from the seam itself.
In an attempt to batch things, I pinned, seamed, and finished the seams between panels 1&2, 3&4, and 5&6 all at once, then did the seam between 2&3, then 3&4 last. That order isn't at all necessary, though, it's just how I did it.
The hip seams on my corset aren't super dramatic, so I had no problems using this seam finish in most places. The bust section of the 1&2 seam was the exception to this. It's a very curved area, so I had to clip onto the wider seam allowance a bit to allow it to lay flat, but also not clip so far that it would show on the outside or let the boning out. I mostly succeeded, but the seam finish is a little bit lumpy. Thankfully I intend to have lace over that area, so you won't really be able to see it!
My felled seams are technically inside out. I thought that to match the bone casings, it would look better to have both lines of stitching visible from the outside (so when I did the seam stitching, wrong sides were together, with the raw edges on the outside of the corset). It doesn't look bad, but doing it the other way around, so only one line of stitching is visible, looks a bit better, I think, especially if your stitches are a bit messy or in very curved places like the bust seam I had issues with above.
Grommets
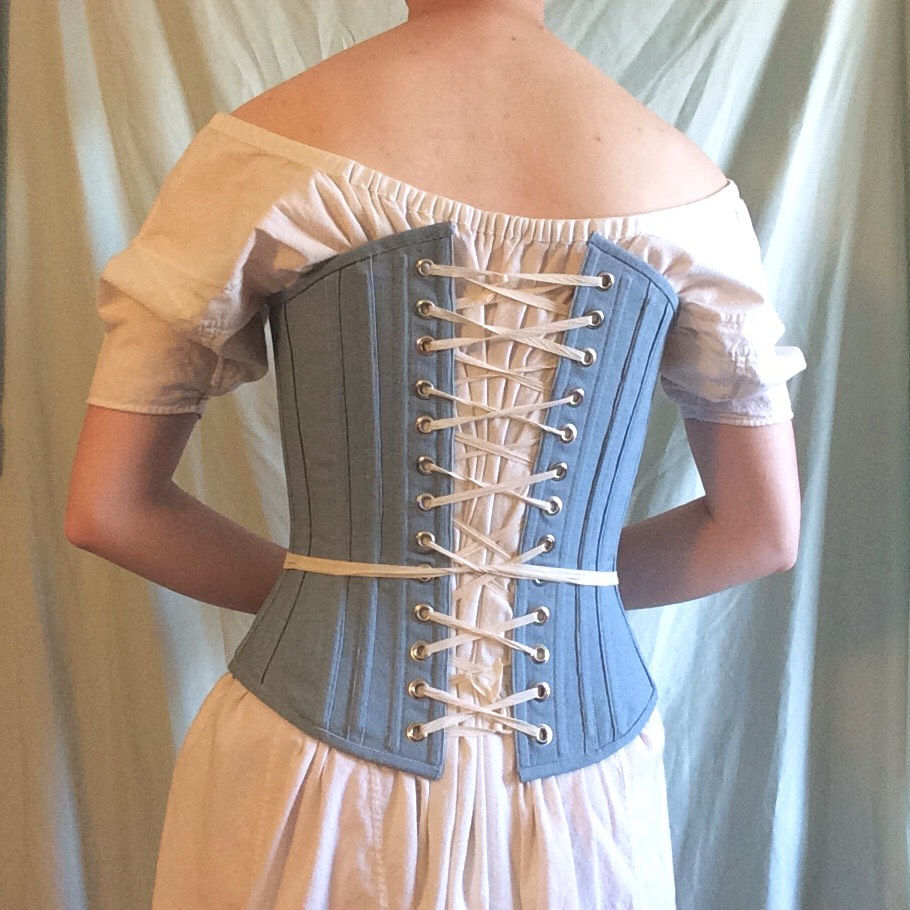
Looking at extant corsets and the corsets other historical costumers have made, I decided to put my grommets 1" apart (from the center of each), making sure there was a grommet directly on the waist line of the pattern.
I got a grommet setting kit (because the punches are expensive) and it did come with all the necessary things and more than enough grommets, but punching the holes and setting the grommets takes a few hours. Things were slow-going on the first few, but sped up as I got the hang of it. (It should be noted that it's considered best practice to use an awl to make holes for your grommets, as it will be stronger than punching holes. Unfortunately, my awl doesn't get wide enough, so I just went with the punch.)
I laced the corset up immediately after I was done with the grommets, following this diagram. By putting the ties at the waist, you can have more tension on the waistline, without affecting the rest of the fit too much. I, personally, also find it easy to reach.
Boning Part 1 & Waist Tape Prep
With the lacing done, I was excited that my corset was finally wearable! I wanted the (almost) full effect though, so I inserted the boning. I used 1/4" synthetic whalebone on most of the seams, except the outer lacing bone and the seam closest to being a side seam (the panel 3/panel 4 seam, in my case). Those bones were 1/4" spiral steel, which I bought pre-cut and -tipped. The synthetic whalebone, however, I needed to cut to length. I used scissors to cut the bones and a nail file to round off the corners.
With that all in place, I could finally try it on! I thought it looked great, and there wasn't too much wrinkling. The bust area, though, is somehow too large and too small all at once. Very strange.
After wearing the corset as it was for a full day to ensure that it was comfortable, I took an evening to baste in the waist tape, following the waistline I had thread marked on the panels. Then I took it over to my sewing machine to anchor one end of each tape to the bask, using the extra fabric I had left in for precisely this purpose. That panel got folded under itself and topstitched down to look like another boning channel. There isn't a bone in it though, since it's right next to the busk.
External Boning Channels & Boning Part 2
I attached a total of six external casings - one each on panels 3, 4, and 6. I measured and marked a line running down the center of each panel, pinned strips of fabric (cut on the cross-grain) along the line, and top-stitched carefully along both edges of the strip.
Because I had basted the waist tape in before doing the external casings, the topstitching I did served as an anchor to keep the waist tape in place on the inside.
I had just enough synthetic whalebone to bone those six casings, so I couldn't do an additional casing on panel 5 like I originally intended.

Binding
I also cut strips on the cross-grain a bit over an inch wide to bind the upper and lower edges of the corset. I think bias strips are usually the way to go, but I'm lazy and my corset doesn't have any wild curves to bind.
I sewed the strip slightly less than a quarter-inch away from the top edge of the right side of the corset, ironed the strip over to get a crisp edge, ironed the 'loose' edge down, wrapped it around the top edge of the corset, and used binder clips to hold it in place. Then I carefully stitched in the ditch from the right side, which (mostly) caught the binding on the inside. I did have to go back over a few places, but I was pleased with my work, especially considering I haven't 'stitched in the ditch' since high school.
Then I repeated the binding process on the lower edge of the corset, and the corset was done!!
Well, not done done, of course. I still intend to floss and add lace to the corset, BUT I can wear it as is, in its current, utilitarian state, and that's what matters! There will (eventually) be a part four to this corset series, where I go over all that. But until then,
Stay warm. Stay safe. Stay healthy.


Comments